Photographer's handy memento
A series of short tips for taking beautiful photographs
Reminders for the photographer's use
Menu
1- Preamble
2- Basic settings
3- Styles of photographs
4- Tips for portraiture
5- Spontaneous family photos or real-life stories about people in action
6- Black-and-white photographs
7- Telling a story
8- Tips for developing
Preamble
The truth is that no camera will capture the full tonality of colour and light effects that the human eye perceives. We are always disappointed with the result because it is far from the reality of what we have seen.
This is a misunderstanding: we do not reproduce reality, but we write (graph) with light (photo).
No matter what we do, we simplify and flatten a three-dimensional reality for a two-dimensional view and, at the same time, freeze a short period of time. The photographer must be well aware of the shooting's technical limitations (dynamic range, contrast, light, definition, context, two dimensions, frozen time). Indeed, the mind is troubled by this imbalance between what it sees (a small, flat, still image) and what it would like to see (a large, animated vision, with depth and motion), and seeks to compensate for the gaps by all means. If it is unable to do so, it provokes a feeling of dissatisfaction. In order to satisfy the viewer's eye, the mission of the photographer is to fill in these anomalies through stylistic artifice and composition. The role of composition is to rebalance an imperfect image to create an aesthetic emotion or tell a story.
For the beginner and the expert: take one of the rules, practise and repeat it until you master it.
Basic settings
1- Perfectly expose your subject, the one in the centre of attention. The photographer makes decisions about lighting and light sources. Exposure and light are the first things to check before framing and staging. Check the presence of high- and low-light areas with the histogram, zebra patterns, or other display techniques. Adjust the perfect exposure of the area of interest (the area where you want to keep all the details) and avoid over- or under-exposing it.
2- Set these three parameters in this order (as the light enters the device in this order): aperture value (to bring in more or less light or control depth of field), shutter speed (to avoid camera shake or for blurred movement), and ISO sensitivity (the lowest possible ISO setting to generate the least amount of noise and most brightness). Or, to put it another way: the aperture outlines the background blur, the shutter speed determines the motion blur and the ISO defines the brightness.
3- Take control of brightness with exposure compensation to increase or decrease the brightness compared to what the camera suggests. When using aperture-priority or shutter-priority mode, exposure compensation allows the brightness to be adjusted more quickly than in manual mode.
4- Use aperture priority to blur the background, to define the focus on people.
5- Use the aperture at f/8 to obtain a sharp quality image under all circumstances when photographing a group of people who are not at the same distance.
6- Photograph sharp landscapes at full depth with the highest aperture possible such as f/11 or higher. For a sharp image from the foreground to the background, adjust the focus from near to infinity by finding the hyperfocal distance: either by estimating the distance from the near area that should remain sharp (e.g., 5 m) and focusing on the area at twice its distance (so adjust the focus to 10 m), or by focusing on the first 1/3 of the distant subject when the subject is far away but not to infinity, while still choosing an aperture of f/11 or higher.
7- Use shutter priority to sharpen or blur pictures with motion, such as water, vehicles, people moving.
8- Vary the ISO according to the light to freeze a movement or generate a blurred movement with a sharp background (for example, a frozen urban scenery with blurred passers-by or cars).
9- White balance is adjusted according to the colour of the main light. When there are many light sources with various colours (because of different technologies of lighting, of colourful spotlights illuminating a stage), adjust the white balance to a neutral light around 5100 Kelvin. The colours of the lights will be part of the composition.
10- For sharp pictures: hold your body securely and grasp the camera with both hands, with your arms against your chest. Take continuous shots or use a self-timer to take pictures without the need to press the shutter-release button. Use a fast shutter speed (greater than twice the focal length of the lens in 35mm equivalent), for example 1/60 to 35mm or ×1 zoom (but 1/125 is preferable), 1/125 to 50mm or ×2 zoom, 1/250 to 110mm or ×4 zoom. Know the lens aperture on the camera that provides the best sharpness (often around f/5.6 and f/8).
11- Perfectly master and know your camera, its reaction speed, its autofocus, its brightness, the situations in which it excels and suffers, in order to react as quickly as possible to capture the best image. It is important to only think about the photo to be composed and the moment to be captured, and not to be delayed in setting up a camera you don't know well.
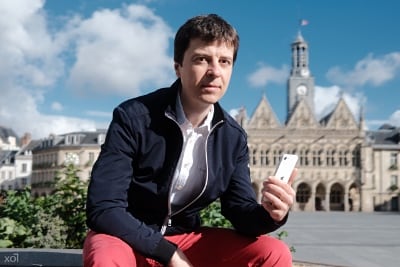
(example of the rule of thirds, slow shutter, bright figure against a dark ground, light rays and diagonal lines; cropping and light colour processing only)
Styles of photographs
Photography is an art that derives naturally from the age-old art of drawing and painting. All the technical questions have already been asked and answered.
Many people wrongly repeat that you should first know the rules, then break them to improve your creativity. Truth is, there are no rules. There are only tools. The craftsman has a whole range of devices that he keeps on his rack and takes the one best suited to his task. Thus, a good picture can be created by simply using the stylistic tool appropriate to a situation.
The style depends on the photographer's perspective. It shapes an image either for its aesthetics and creating an artistic emotion, or for its documentary aspect by telling a kind of story, or a bit of both. The idea is to conceive a visual representation of a scene (not to reproduce reality) that appears to us as an abstract or a glimpse of the world, in order to communicate it to others with a particular expression or execution. So the photo is not a picture, it is an idea!
Styles are tools that must be known and mastered through practice. Then, we wonder how to harmoniously combine all these processes (light, shadow, figure to ground, perspective, line…) through composition to design an image. The notes below present shortcuts that serve as a basis for any creation that has proven its effectiveness, if not original, to imagine an aesthetic emotion or tell a story.
1- What is the subject? What is this picture supposed to say? Why do I want to capture this image? The subject is the first thing the viewer should see. So, I focus on that inspiration and use styles and techniques to bring the image to life.
In general, the good picture is the one that offers an “improved” or “alternative” version compared to real life.
2- The fundamentals. Photography is like any other art of signs using the dot, vertical, horizontal, diagonal and curved lines as the basic signs. Apart from the dot (or area), the lines are there to organize information.
The dot or the area: the figure to ground relationship. The figure is a distinctive element of the image and the ground is the scenery element behind it. A light figure on a dark ground or a dark figure on a light ground is required. By doing so, you understand that this figure is the subject (the eye goes first to the sharpest point and the strongest contrast). In black-and-white, all that is needed is a contrast difference between the figure and the ground. In colour, in addition to the light/dark contrast, a second adjustment must be added: a warm-coloured figure on a cold-coloured ground or a cold figure on a warm ground (black is a cold colour; the opposing colours may not be necessarily obvious, but they must be somewhat visible), otherwise the image will be monochromatic. Therefore, when taking the picture, always look at what is behind it because the eyes deceive us by focusing only on the subject. The “gesture” of this light must be obvious and unambiguous to make a good photo.
Light on the subject. In addition to the contrasting figure to ground relationship, make sure there is enough light on the subject to identify it. For example, the light is either on the subject, or its contours are drawn by highlights. To find the right position towards the light: locate the main source of light, for example the sun, turn your back to see how it illuminates everything with the light, then turn around the subject against the light and to the side. Each position offers a particular type of light and intensity. When you look at the figures from the side, you see their faces illuminated and their backs in shadow, then you observe how the light spreads this contrast around the figure's volume with its middle tones and cast shadows. It is the presence of shadow that gives the lit side its beautiful luminous quality. Without shadow, good lighting is impossible. If you are not sure about the lighting, look at the quality of the shadows. Avoid extraneous lights that interfere and distract attention. To create a hierarchy between multiple subjects, the main subject receives the most light, the second a little less, and the third even less. This gradation adds depth because when you look from a distance, due to the thickness of the atmosphere, everything becomes grey and less saturated, this effect also works with a short depth of field.
Horizontal, vertical, oblique and curved lines. Lines organize information by linking different items together. By creating a form of consistency in the midst of chaos, they provide support and structure (the skeleton) to the whole image. The image composition relies above all on the main line. It is this line that determines the dominant direction. Should the photo be oriented in landscape or portrait mode? You have to see the dominant lines. If they are horizontal lines: landscape mode; if they are vertical lines: portrait mode. With multiple directions, the strongest direction is often the longest one.
The diagonal depicts the movement, it gives the direction of the composition or it brings an illusion of perspective to increase depth. When the lines intersect, it is called an "eye" that brings the point of interest into focus.
The S-curve or arabesque is used to connect and organize elements together.
The “gesture” of these lines must be obvious and unambiguous to make a good photo.
The perspective. It presents the convincing illusion of a 3-dimensional scene on a 2-dimensional surface. The dominant lines provide structure but not depth. There are 5 kinds of perspectives and they can be combined with each other:
- Linear. Photography generally uses 3 types of linear perspectives. 1 point linear perspective: all vanishing lines converge on a single spot, e.g., you look towards the street in the foreground and the lines converge towards the horizon in the background. It gives depth to a scene that already has great depth. Beware, when it is simplistic, it is boring. 2 points linear perspective: 2 opposite directions with 2 vanishing lines from the centre to the left and from the centre to the right, e.g., looking at the corner of a house with one street going to its right and another street going to its left. 3 points linear perspective: lines vanishing from the centre to the left, from the centre to the right and from the centre upwards (or downwards) as you look upwards (or downwards), e.g., when looking at the corner of a building or an object. This gives a three-dimensional view. In contrast to 2 points linear, here you see the whole object or building.
- Curvilinear. It is often found in architecture (arch, dome, path) and sometimes in nature (river, canyon, vegetation). This curvilinear perspective also occurs with the distortion of the optics. The curve underlines the movement. If the curve goes to the inside of the scene, it creates a very great depth of field.
- Atmospheric or aerial. As an object becomes more distant, its contrast and luminosity diminish and everything becomes grey or pastel. It is observed in landscapes with morning or late afternoon light or fog. This atmospheric perspective can be simulated indoors with daylight projected into a dark room through a small opening. This creates an impression of hierarchy between what is near and far.
- Planar. This involves superimposing the foregrounds, middle and backgrounds like overlapping sheets on top of each other. It does not rely on vanishing lines. The figure in the foreground is large because it is close (a man is looking at the sea), the figure in the background is small because it is far away (a boat on the horizon, but you know that the boat is large in reality). These layers must be clearly distinguishable, otherwise the scene becomes flat. It is the superimposition of the layers that gives depth (the silhouette of the man covers part of the boat or other intermediate layers).
- Scale. Scale perspective relates to an interval. At least two identical objects are taken. The figure in the foreground serves as a reference and the other similar figures, when positioned in space, decrease in size to give a depth of field. With people, the person in the foreground is large, the one in the background is smaller.
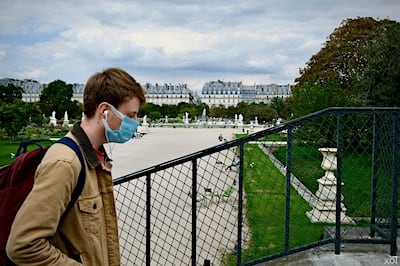
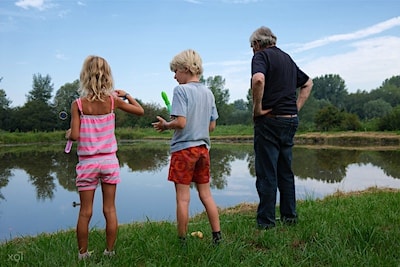
(planar, atmospheric and one point linear perspectives, dominant horizontal and oblique lines for movement from left to right, dark figure (man) on light background (garden path); only cropping, slight colour processing and exposure)
Highlights and deep shadows should be on the subject, no other element in the scene should receive the same intensity of light.
Choose a shot among the 3 angles, from the top-down, the eye level or the bottom-up, to vary your perception of the subject with a background that is as understated and uniform as possible.
Blur the background to make the picture uncluttered, for example, by adjusting the aperture priority.
Isolate the subject to draw attention. Get as close as possible to the subject to reveal a simple and intimate view. Remove all the context in order to stimulate the viewer's imagination.
Pay close attention to the background, which must not distract the subject, such as a light as intense as the one that illuminates the subject, a colour that disturbs attention, an element behind the head, a texture that confuses the leading lines, a distinctive and non-blurred pattern.
The main subject is enhanced when it is associated with a secondary subject or support that completes the composition of the image. This support provides context and creates a visual balance in another part of the image. The main subject thus occupies a notional space, surrounded by a negative space. These two spaces capture the viewer's gaze, while the support occupies a secondary space. This composition does not present an image “of” the subject, but an image “about” the subject, where each element conveys an idea. The wide-angle lens is ideal for this.
Use colour in a monochrome environment. Focus on the subject that has a colour that contrasts with the whole, and isolate that colour from the rest of the shot.
If the place is boring, find a universal symbol or a combination of symbols well known by everyone which will be stylishly photographed (a vehicle, a façade, a door, a window, a piece of furniture, a bottle, an object…). It doesn't matter where it takes place, what will be interesting is the image that will be drawn from these elements.
4- Don't photograph the obvious, that is to say, what everyone sees, you have to surprise the viewer. Don't photograph at eye level by framing as humans see, but change the angle of view from the bottom or the top, or by including an unusual feature. Don't photograph a simple scene, but find a view from behind the scenes or include spectators' reactions.
5- Use burst shooting mode to get the right image of a moving subject, a correct posture or stride.
6- Find patterns, repeating elements (same shape, same size, same colour) and enhance them with perspective or light effects. Always photograph these repetitive elements with an odd number. The result is better when this repeated pattern, which fills the whole image, is interrupted by a different shape, size, colour, contrast… When the repeating elements are not at the same distance, photograph them with a zoom to flatten the depths and an aperture between f/8 and f/11. Try to bring out an angle, a straight line, a perspective with the repeated pattern.
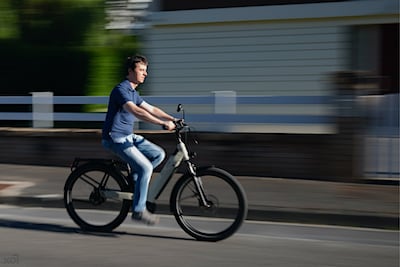
7- Take pictures of a sharp subject with a blurred background to suggest an impression of movement and speed of the subject. To do this, the camera must follow the subject's trajectory and velocity. This works best with low light and manual focus. Use slowest shutter priority or the most open aperture for an even blurrier background. With a low ISO and a high aperture above f/8 and f/11, the shutter speed is slow because less light enters.
8- Take advantage of light rays as if there were a large natural light projector (between two buildings, at sunset…) or use an intense reflection of light on a wall to photograph the subject and the background in a scenic way. It will probably be necessary to underexpose the photo to keep the subject properly exposed to the sun.
9- Display a grid or lines on the screen to help position the subject or attract attention. Place points of interest at the rule of thirds guidelines intersections or group items on one-third horizontal or vertical lines. The rule of thirds should be followed simply as a starting point, as the rest of the two-thirds should not be empty (create a progression such as putting a second element further away in perspective or of varying brightness or softer tone).
The other alternative is to centre the subject. This requires following a few principles: the subject is alone in the centre of the frame to draw attention to it (the scenery to the right and left should not be distracting, as the eyes do not have to look for what is important in the composition); the face or eyes are placed at the upper third horizontal line; this framing is ideal with a 1 point linear perspective towards the central spot, playing with the leading lines and symmetry to bring great depth to the composition.
10- Use natural straight lines to lead the eye to the important point of the image. Diagonal lines (at least 2 lines) direct the point of origin and vanishing point of a movement. Two parallel lines emphasize image stability. Make the most of geometrical shapes such as an S-curve or an angle (a pathway where the eye travels), a triangle (perception of authority from where the eye should focus), a circle (feeling of completeness, of protection), a rectangle (stability). These lines can be found everywhere in the scenery, the landscape, the architecture but also in the posture of people and animals.
11- Rule of odd numbers. It does not only apply to repetitive elements, but also to the number of objects in the frame. 1, 3 or 5 significant elements are enough in a composition.
Set up a well-distributed group of objects in the image to balance the "weight" of the objects and the space they occupy in a composition.
12- Take pictures from a high position and point down to the ground. This shows a very interesting perspective to the image, especially if you focus on a few people with often a very large negative space. This overall view brings a theatrical effect to the composition or an emotional detachment, this is the gods' point of view.
13- Capture photos with an important symmetrical subject (perfect for urban or natural landscape). You must stand precisely at the centre point of the subject's symmetry. And for subjects related to architecture, you must avoid any point of view that would create a distortion in the symmetry.
14- In the large space of a natural or urban landscape, you should always observe an impression of depth, from the foreground to the background to give perspective or scale and avoid a flattened 2D aspect without reference and without relief. Locate a vanishing line (road, path, large curve) from the foreground, then to the middle, up to the background. Find an element to put in the foreground to create this depth in space. This depth effect can also be used in smaller spaces and create a kind of story (the arm extended towards the lens, another person, or an element of the scenery is in front of or behind the main subject…). To erase crowds, take very long exposures (small aperture, small ISO, neutral filter) with a tripod, or locate elevated places to make people and cars look small, or stand in front of a pool of water or a comparable location where no one is around.
15- In an urban environment: anticipate the direction a person is going and frame ahead to his destination while waiting for him to enter the field. Select a wide, bright aperture around f/5.6 with a continuous burst shooting mode to capture the correct posture or stride.
Take silhouettes (against the light or in strong contrast of light or strong contrast of the colour of clothing) or with a colour scheme (likeness or contrast) between the person and the scenery.
Play with reflections (mirror, shop window, puddle, rear-view mirror, reflection of a metal plate…). To capture the reflected surface, first, compose and lock the exposure and focus on the actual subject, then rotate your body toward the reflective surface and take the picture.
16- Landscape and cityscape photography follow the above tips: aperture at f/8, f/11 or higher for a high depth of field, if necessary, focus at the hyperfocal distance, composition with depth or perspective. Each season and time of day delivers its own light to create an image that is always unique; the golden and blue hours are often the best ones. 1 to 2 hours after sunrise or before sunset, the light is not grazing, but a back-lit photo can be taken with the sun slightly to the side. For vegetation or a landscape with warm colours, accentuate these slightly warm tones either by taking advantage of convenient light or by shifting white balance or colour processing to amplify this warm tone. For landscapes with predominantly blue tones, make the same adjustments with this colour. After the rain, the colours are even more saturated. It is sometimes beneficial not to photograph a piece of sky that is too bright, unattractive, and useless to keep only the rest of the landscape. The rule of thirds is not always appropriate for a well-balanced composition with regard to the strength of shadows, lights and colours. Framing in panorama aspect ratio (an elongated rectangle) helps the composition. If a person crosses the horizon line, either their head is below this line or the line is below their pelvis. For a sunrise or sunset, you need to find a part of the scenery that will be backlit to serve as a reference and scale for the composition.
17- Wildlife photography is like composing a portrait whose attention is drawn to the eyes. Choose a soft light (in the morning, in the evening, cloudy, shady), a wide aperture priority mode around f/2 for a shallow depth of field, a strong zoom, a burst shooting mode to capture the right posture and a lot of patience so that the animal gets used to you.
18- Sports photography requires a shutter priority mode at 1/500s to freeze the movement, a wide aperture to bring in the maximum of light to blur the background and focus on the player, a continuous autofocus and a burst shooting mode to capture the right posture. Photographing the subject at a bottom-up angle enhances the power of the athlete's effort.
19- The night show or live performance takes place in low light. In order to capture an expression, the sensitivity of the sensor must first be greatly raised with a high ISO, the widest possible aperture such as f/2 to let in as much light as possible and a shutter speed between 1/125 and 1/500 to freeze the moment.
20- Still-life or object photography is a complex genre with its own codes.
For a minimalist image: place the object in front of a neutral background and close to the window, opposite the window and the object, put a reflector (a large white plate) to bounce a subdued light and brighten the shadows on the object, aperture priority mode around f/8 for sharpness, and lastly make a slight overexposure. This use of light is also effective for portraiture but with other settings for other effects.
For flower or plant photography, a soft light (cloudy, shady) is required, aperture priority mode will be set according to the desired blur between foreground and background, and the distance at which the picture is taken (at few centimetres from the flower, an aperture at f/8 or higher is recommended). Take a simple picture as indicated in point 3 of the Styles. Placing the camera on a tripod allows you to take your time composing the image. In windy conditions, the shutter speed will be around 1/250 with a burst shooting mode to freeze the best pose.
21- Playing with light.
Find a strong contrast between the subject and the background.
Discover the balance between bright and dark. An image does not have to obey the rule of thirds as long as it respects this balance between the weight of bright and dark. The balance is to be understood literally because it is the eye that tilts this balance. The darker areas carry a heavier "weight" than the lighter bright areas, therefore, the bright area will often take up more space than the dark to find balance.
22- The eye reading direction tells the story of the photo by a beginning and an end. We read from left to right, out of habit, our eyes will follow the story of the photo in the same direction. Orient the photo to create a progressive reading of this story (requires cropping, flipping, reversing the direction of the image) from left to right.
For a direction other than from left to right, eye reading often goes from dark to bright because the eye is attracted to light.
Also, diagonals and leading lines give the starting point and the path of the eye's reading. If the leading line reaches the edge of the image, the eye goes out of the frame and gets lost. To avoid this, the leading line must be blocked by a perpendicular element (scenery, colour or light) to end the reading, this also serves as secondary support or structure to the photo.
23- Use of colour.
Warm colours red, orange, yellow () are dominant as they grab our attention first and reach our eyes before the cooler colours. The cold colours blue, green, purple () are receding, they fade into the background more. Compose the picture with contrasting colours: yellow or orange with blue or , red with green or light blue or or , purple with green , the triad blue, red and yellow . The complementary nature of the colour can be approximate in order to keep a natural rendering. For a good balance, the main colour should represent between 2/3 and 3/4 and the complementary colours will share the rest. In addition, the brightness must be taken into account: if the main colour is light, then the complementary colour will be dark, and vice versa.
The colour carries an emotion. Warm colours suggest strong positive or negative feelings of passion and energy. Cold colours are the opposite of warm colours suggesting positive or negative feelings of restraint, softness, nostalgia and thoughtfulness.
Colour can be used to enhance the depth of field. The eye detects the light first (the light shows the subject), then the warm colour and finally the cold colour at the end. If the subject is in the middle-ground layer, the foreground is of cold colour with less light. If the subject is in the foreground with a dominant cold colour, attention should be paid to disturbing warm colours in the background.
The clothes worn by the subject will be chosen accordingly (neutral clothes in a shimmering decor, colourful clothes in a subdued space, outfits with patterns in a sober scene or the other way round).
Build the image with blocks of colours (ideally of odd numbers) that will be used for the composition, they do not need to obey the rule of thirds.
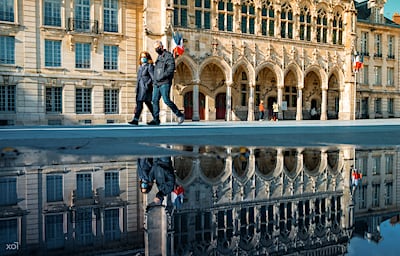
(Reflection, symmetry, dominant horizontal line, contrasting colours orange and blue; colour and exposure processing only, slight cropping).
Tips for portraiture
1- Choose a soft light (in the morning, in the evening, cloudy, shady) or a back-lit face illuminated by the flash, so as not to create too harsh shadows under the eyes and nose or to make the model grimace when blinded by too much light.
2- Take a portrait photo by positioning yourself lower than the model, with the camera angle pointing upwards. 2nd possibility: the lens must be at the level of the nostrils, which are the centre of the face. 3rd possibility: the lens is at the level of the third eye, the subject remains head upright and looks up towards the lens. Use a 50 or 80 mm lens (35mm equivalent) or a ×2 or ×3 zoom lens, with the widest possible aperture around f/2 for a blurred background (which highlights the subject).
3- Using the frame technique, it gives depth, a story, a context. Place the subject in the middle of a frame, e.g., a door, a window, two columns, two trees, in front of or through these frames, or any symmetrical composition such as a mirror reflection, two people in the foreground and blurred and the sharp subject in the centre. This frames the portrait or model, it is even more imposing when orienting the camera in portrait mode.
4- Use negative space to direct all attention to the subject. Negative space occurs when the majority of the composition or background is neutral where no particular detail is emphasized. This can be a wall, a large staircase or any other pattern. The subject will be in a corner of the picture surrounded by a large negative space.
5- Use drop shadows to add depth and dimension to the portrait. The light should be low (almost horizontal), directly illuminating the subject and casting a shadow on a wall or any negative space. It is best to use a long ×3 or ×4 zoom, and an aperture between f/2.8 and f/4. If the sun is low, make the model look at the sun even if it is difficult (she closes her eyes and, when taking the picture, she opens her eyes).
6- To put your subject at ease, she must be or act “natural”, having a light and easy communication, sharing the photos, even if the result is not the one you want (it is not the model's fault, it is the photographer who doesn't find the right way), always keep a good expression so that the model stays relaxed. The distance is important, nobody likes to have a camera too close to you. The smile is not mandatory, the smile is a mask, erase it to see a real representation. Observe the subject and watch what she does when she is not posing and use this as a guide for her pose. Take the picture making to believe you are busy with something else (pretending) to keep the spontaneity of the model. Don't worry about what the subjects are thinking, they are mostly concerned about themselves and not about the photographer.
7- To pose a full-length portrait, the model rotates her hips by 45°, one leg forward and puts the weight of her body on her back leg, her face is facing the lens, this pose lengthens the silhouette. Doing the opposite by posing the weight of the body towards the camera lens suggests very different attitudes. Hands should be busy and not lying along the body. It is flattering for women to give an “S” curve to their body and keep their hands open, and for men to put their shoulders back and have their hands grasping something to have a closed fist. Then the model forces herself to straighten and stretch to grow. For the head, do the turtle to separate the chin from the neck, the head remains straight with the neck stretched forward, lower the head slightly by 5° and the eyes look straight towards the horizon. Finally, for natural and dynamic poses, the model must move, for example, she walks thinking of something pleasant and looks in different directions.
8- The eyes are the centre of attention (not just for focusing), think about what the eyes are doing, where are they looking?
9- Place the dominant eye on the central vertical line of the photo. This gives the impression that the eye follows us!
10- Examine the staging, the relationship between foreground and background. Choose what to include and exclude. Sometimes the background says more about the subject than the person herself, it presents the context, so don't blur it with a wide-open aperture.
On the other hand, with a plain background, the face should express, not an emotion, but a character trait, a personal quality. All the composition techniques will then be at the service of this expression.
11- Light creates an atmosphere, mood and shapes. It sets the stage for the subject.
(bottom-up angle, dominant eye on the central vertical line, repeated oblique lines, foreground and background staging, warm figure on a cold ground, light and shadow; only cropping, slight colour and exposure processing, simple eyes retouching)
Spontaneous family photos or real-life stories about people in action
1- Use an aperture between f/4 and f/5.6 to get good sharpness on the subject with a very slight blurring of the background because there are often several people to be photographed at the same time, the slight blurring draws attention to the subjects.
2- Good light gives a fast shutter speed and a sharp image (when everyone is moving around without posing). Choose a long enough zoom with a fast shutter speed or a higher ISO so as not to disturb people in their interactions. It is best to have low light in the early morning or at the end of the day. Capture people as they interact with each other.
3- It doesn't matter if some people turn their backs when you can recognize them or when you know their role within the family, as long as you take the people who are involved in what they do. The main thing is to show the energy that comes out of the composition. Always take the images in burst shooting mode because people are photographed in action.
4- Finally, portrait-oriented photos are ideal when you want to produce large-size prints to hang on the wall or in a picture frame (for an exclusive focus on the person and not on the environment).
(angle from below, rule of odd numbers, diagonal lines, reading direction from left to right, warm-coloured figure on a cold-coloured ground; only cropping, slight colour and exposure processing)
Black-and-white photographs
Black-and-white photo is mainly chosen to convey an emotion. Today, it is used for portrait, landscape, street photography and high-contrast scenes. Convert the image to black-and-white and judge whether its composition is still as strong as before, as only the subject and the light remain. If not, this means that the photo is greatly relying on colour on which you should prioritize.
1- Plan to shoot in black-and-white. Why take the picture in black-and-white? It is the fundamental unit of writing with light (photo - graph). It gives a more timeless aesthetic where colour could give an idea of the date or an unnecessary distraction. Black-and-white photography has become an art with its own codes and standards.
2- Look at the abstract side of the composition. Emphasize oppositions of light, the importance of negative space, line, form, pattern, texture, contrast. Without colour, it gives a canvas of forms and tones.
3- Take the picture with colour filters. For example, the red filter forms a theatrical sky, when you give a very important place to the sky, it overwrites the rest of the photo to give it a disproportionate span. The green filter evens out the skin texture of a portrait. The yellow filter adds a little extra contrast.
4- Use HDR by taking multiple exposures in raw, unprocessed (RAW) format to obtain the widest dynamic range and thus have maximum control over bright/dark retouching.
5- Dodge (lighten) and burn (darken) during photo processing. With black-and-white, you have a lot more latitudes to go to extremes and play with all levels, textures, contrasts… You shape the photo.
6- Use a long exposure time. This helps to distinguish differences in texture, ideal with moving water, smoke… Using a polarizing filter is handy to remove unnecessary reflections. It puts forward, not a subject, but the place you are photographing, with an impression of time passing.
7- A good black-and-white photo has true black and true white as well as all shades of grey. You have to find all the light tones in the picture, this gives it a complete character (but you don't need to have a balanced amount of tones). See Style #21 on the “weight” of bright and dark.
8- Understand how the transition to black-and-white influences light and mood. All the colour and warm or cold impression provided by sunlight no longer exists, it is replaced by contrast. Direct sunlight makes a very strong contrast and therefore a very intense or dramatic focus on the subject, texture or abstract side. Cloudy weather or diffused light brings a more serene feeling due to its lack of sharp contrast.
9- Use black-and-white to accentuate the atmosphere or mood of people. A black-and-white portrait intensifies the expression and emotional tone of the photo, giving a stronger connection with the viewer. Because of this, you must pay full attention to the eyes that convey that emotion. Eyes are an important part of the way we read people's expressions, they also contain extreme black-and-white.
10- Since you change while abandoning colour, you might as well do the same for framing, which must be radically transformed by varying perspective, angles or different points of view.
11- Breaking with conformism. Trying to take a black-and-white picture of a subject that would logically be in colour. This provokes the spectator's eye on something unexpected, on the shape, the texture… It is the colour photo converted into black-and-white that will give a scenic and theatrical aspect to the subject, and that excites impact and visual interest. Images that basically have little light tend not to make good black-and-white photos.
12- Instead of making black-and-white, make monochromatic where the same colour appears in the whole image with different tones, or with two close colours. You can enjoy a naturally monochromatic subject that is often found in a landscape such as green or brown (a natural element, a macroscopic view). The subject can be coloured by retouching, as long as the colour tone appears to be one of the natural colours of the subject.
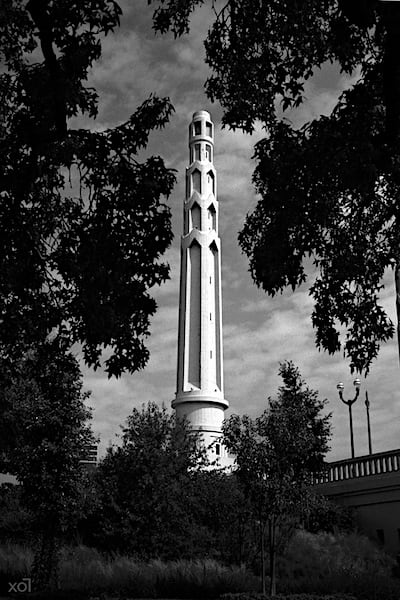
(all in shadow, light and shape; only brightness retouching for high contrast, with sharpness and grain)
Telling a story
“A picture is worth a thousand words.” It is exceptional that a single photo can stand on its own with a perfect composition combining story and aesthetics shot at the right time. These images are famous, they are rare, and even from great photographers, only a handful of them, at best, have become iconic. If there are too many complex ideas to include in a single image, then a project must be designed. But making a small photographic documentary is just as satisfying and more accessible, turning us from image thief to storyteller. Without seeking anything spectacular, these “stories of little things” (a trip, an event, a place, an encounter) can create beautiful projects of human vision. Just anything that has a beginning, a middle and an end is fine.
Take your time for your project, prepare yourself, do some research, talk to people in the field to find out more. You have to be more than a photographer who presses a button all day long.
1- Capture the images. The simplest method is to draw inspiration from a film narrative by shooting several different scenes and applying various composition techniques.
Set the scene (establishing or wide shot), present the story and the people (medium shot), show details (close-up), observe and link the scenes together (transition shots). Repeat this pattern as soon as you change places or times.
2- Take stronger images. First of all, it is a picture that produces an emotional impact on the viewer, even with an imperfect technique! An intense image combines a harmonious composition (the subject, the moment, the light and the scenery), conveys clear information and inspires a feeling.
To be emotionally moving and touching, the photo often contains a human element. The face expresses an emotion and the framing shows us why. Or the singular composition of a landscape, a scenery or a still life can trigger an aesthetic emotion.
Inspiration must be in line with reality by finding the rhythm of a place, going with the flow. The photographer is always mindful of being in this “zone” to capture the moment. Be careful when inspiration and previsualization want to overcome this simple reality. Distortion of objectivity causes disappointment by producing an overly fabricated or off-topic image.
Expressing a point of view: moving from photographing points of interest to showing a point of view. For example, tourist photography = point of interest; how it is made = point of view. This personal vision helps to anticipate and visualize potential photos. To develop this asset, it is easy to build on what you already have: be aware of the experience already acquired in your personal and professional life and integrate this maturity in your photography. As few people will have lived the same life, the sensibility will be unique. Having an original style is not a point of view, it is just an aesthetic gimmick. Before taking the picture, ask yourself the question: “What do I want to see? What matters to me must be seen in the picture.” After taking the shot: “What does this picture mean to me and what is it telling the viewer?” This last question draws the line that separates the amateur from the artist when the idea conveyed by the artist also resonates with the viewer's life experience.
Photos can be carefully composed in several layers of perception (as opposed to a simple image) and with meaning. In this way, the viewer's attention is held for a longer period of time. When photographing a scene, try to compose these images with multiple layers, i.e., there are several images in the picture and they complement, interact with, or diverge from each other.
Take control of the entire frame. A storyteller is not just a photographer, it is responsible for the full image. You must learn to be aware of the whole rectangle in front of your eyes. It is important to include small details to tell a story in a single frame. A person's story can be discovered in these details: a wide-angle portrait surrounded by some of his favourite things, the decoration and furnishings of his room, the objects on his desk, a close-up of his hands in action…
Trust your instincts. If you notice something special that offers a photo opportunity, try not to overthink the situation, trust your instincts and see how it unfolds.
3- Display the images. In photographic narrative, the images are arranged in a certain order, chronologically or serially, for the purpose of directing the viewer's vision and mind. Titles and captions are also part of the storytelling to help us understand the context of each image. But it is the image that must tell the story, never the other way around! Whether it takes the form of an exhibition or a book, the visual storytelling includes a leading or opening shot, a main shot, action and transition shots, and a conclusion or closing shot. The images featured in a series are carefully chosen to keep only those that serve the story and share an emotion with the audience.
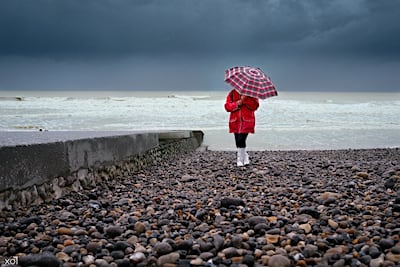
(a simple photo with several large negative spaces, the warm red colour of the subject contrasts with the monochrome and cold environment, a sense of loneliness and meditation; only cropping, slight colour and exposure processing)
Tips for developing
The word retouching is used for slight adjustments or finishes. For more major alterations, the term processing or development is used. The purpose of this work is to emphasize features through the use of styles.
1- Start with cropping to balance the composition, to simplify by removing unnecessary and confusing content, to focus on the subject and its position. If you have to crop a body, do not cut limbs when they are too close to their joints (phalanx, wrist, elbow, knee, ankle), include the ears for a face in profile.
2- The priority is to set up lights hierarchy on the subjects (see point #2 of the Styles). Darken disturbing secondary lights and bright areas close to the edges of the picture otherwise the eye is blinded and goes out of the frame (e.g., darken the sky). During the processing work, briefly switch the photo to black-and-white to analyse the bright areas and check whether the lights hierarchy is successful. The colour is adjusted later to provide an atmosphere or to underline an emotion.
3- Do not fall into excesses. The gaze must be satisfied with what it looks at first, even if this element is not the main subject of the photo. Do not hide the obvious by making it dull, but guide the eye through the light to the rest of the picture. The processing is overdone as soon as an area seems artificial or if the viewer feels some form of discomfort or dissatisfaction. This is because the obvious has been transformed too much and the eye has to make an effort to rectify it by itself. This effort tires the eye and is detrimental to the pleasure that the image can provide. Start again to return to simplicity.
4- For a balanced skin colour (whatever the skin colour), generate a strong blur on the face and select the median skin colour in CMYK. The balance is found by reading the Cyan number as a reference, then Magenta = Cyan × 2, and Yellow = Magenta × 1.25. If the Cyan, Magenta and Yellow do not approximately match these values, then they must be adjusted. Set the colours with the RGB Tone Curve around the 60 to 70/255 or 38% input points. With the Red Tone Curve, + gives more red, - gives more cyan. With the green tone curve, in + gives more green, in - gives more magenta. With the blue tone curve, in + gives more blue, in - gives more yellow.
5- To beautify the face: lighten the whites of the eyes, darken eyelashes, eyebrows and upper eyelid, darken or lighten around the nostrils, cheekbones and lower jawline to create a depth effect, darken or lighten lips for mood.
What does xo7 mean? It is my signature for Writing with Light. The “x” suggests the most elementary sign of writing, everyone knows how to draw it, even illiterate people. The “o” is the link between “x” and “7” whose circle recalls the camera lens, the means used to write. The “7” is an inverted “L” to express light. The “L” is upside down because I do not reproduce reality, but I freely interpret what I see.
I like the tricolour style: with a warm colour, a cold colour and a ray of light.